
01
Light, bent twice
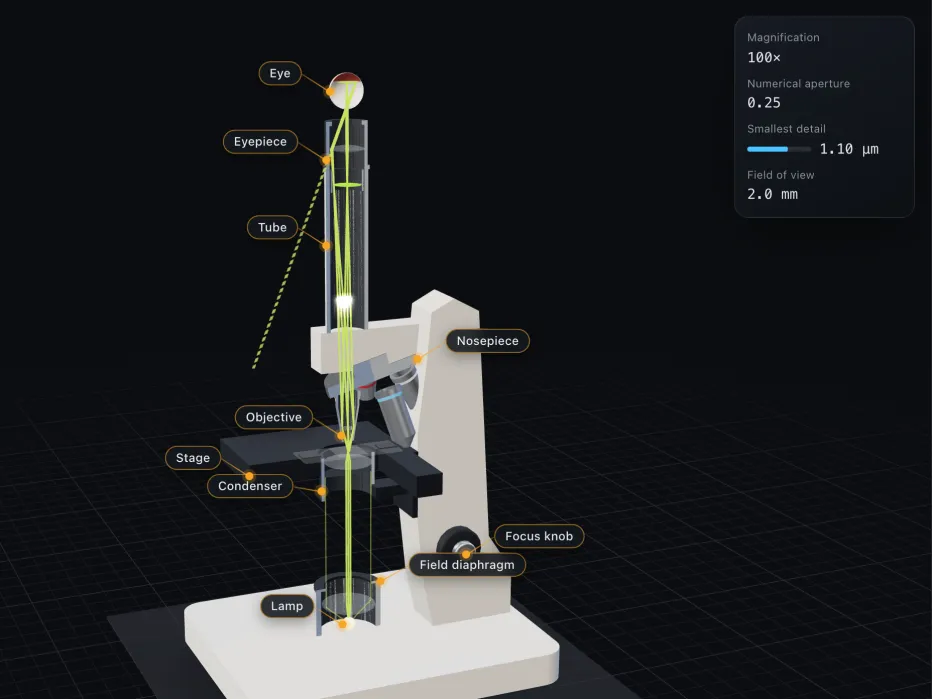
You are looking at a light microscope, the kind found in school labs. It is called a compound microscope because it magnifies in two stages. The objective, the small lens just above the slide, makes an enlarged picture inside the tube. The eyepiece, the lens you look into, enlarges that picture again. The idea is old: in 1665 Robert Hooke looked at cork through an early compound microscope and called the tiny spaces he saw cells.
The light travels up through the middle of the instrument. A lamp in the base shines into the condenser, a lens under the stage that aims the light at the specimen on a glass slide. From there the light enters the objective, runs up the tube and passes through the eyepiece. The last lens on its way is the one in your own eye, which focuses it onto the retina at the back. Each lens bends the light, and together they turn a speck far too small for your eye alone into a picture that fills your view.
The model shows the microscope cut open, so you can see the glass inside, and draws the light as rays. They start from two points of the specimen, one in the middle and one at its edge, and run all the way to the eye. Real light makes this trip far too fast to follow, so the loop sends a pulse of light along the path in slow motion. The timeline counts millimetres along the path from the lamp.
Drag the model to look around it and scroll over it to zoom. As you read on, the view follows the text. Turn on the labels to see the name of each part.
02
What a lens does to light
In glass, light travels at only about two thirds of its speed in air. When a ray meets glass at a slant, the slowing turns it, so it points more steeply into the glass. When it leaves, it turns back the other way. This bending is called refraction. How much a material slows light is its refractive index. For ordinary glass it is about 1.52.
A lens is a piece of glass with curved faces. A converging lens is thicker in the middle than at the edge, so it bends every ray toward the middle. Rays that arrive parallel all meet at one point, the focal point. The distance from the lens to that point is the focal length, and a short focal length means a lens that bends light hard. One strong lens can already do a lot: the tiny single-lens microscopes of Antonie van Leeuwenhoek magnified up to about 270 times.
Now place a small object a little farther from the lens than its focal length. Rays from each point of the object spread out, pass through the lens and meet again at one point on the far side. All those points make a real image: the rays actually meet there, and a sheet of paper held at that spot would show the picture. It is upside down, because rays from the top of the object cross the centre line of the lens and land at the bottom. The closer the object is to the focal point, the farther away the image forms and the larger it is.
The condenser under the stage has a different job. It does not magnify anything. It gathers the light from the lamp and concentrates it into a cone that lights the specimen evenly. Its iris diaphragm, an opening that can be made wider or narrower, sets how wide that cone is. Lower down, the field diaphragm limits the light to the patch you can see, which cuts stray light. The model keeps the lighting simple, with the condenser focusing the lamp onto the specimen. In 1893 August Köhler of Zeiss worked out a better setup, which gives even light with no image of the lamp filament in the view.
03
The objective makes a real image
The objective is the small barrel of lenses just above the slide. Its focal length is very short, and the specimen sits just outside its focal point. So, as in the last chapter, the image forms far away on the other side and much larger. On a classic microscope the tube is 160 mm long, and the image lands 10 mm below its top, right where the eyepiece sits. Many newer microscopes use a second lens in the tube to form the image, but it lands in the same place.
This intermediate image is real. The rays really cross there, so it floats in the air inside the tube. It is upside down and back to front, and it is enlarged by the number on the objective: a 40× objective makes it 40 times wider than the specimen. The eyepiece looks at this image, not at the specimen itself. Try the four objectives.
Each objective carries two numbers, its magnification and its numerical aperture: 4×/0.10, 10×/0.25, 40×/0.65 and 100×/1.25. The stronger the objective, the closer it has to come to the slide. That gap, the working distance, shrinks from about 25 mm at 4× to about 0.6 mm at 40× and just 0.13 mm at 100×. The patch of slide you see shrinks too. A standard eyepiece has a field number of 20 mm, the width of the round opening inside it. The patch is that width divided by the objective's power: 5 mm at 4×, 2 mm at 10×, 0.5 mm at 40× and 0.2 mm at 100×.
Turn the nosepiece and the next objective swings into place. The objectives are parfocal: each is made so that the specimen is sharp 45 mm below the shoulder where it screws in. So when you switch, the picture stays nearly in focus, and a small turn of the fine focus is enough. The 100× objective is the odd one. It needs a drop of oil between its front lens and the slide, and the chapter after next explains why.
04
The eyepiece and the eye
The eyepiece is a magnifying glass for the intermediate image. It sits so that the image lies exactly at its focal point. Then the rays from each point of the image leave the eyepiece parallel to one another, as if they came from something very far away. So your eye can stay relaxed, just as when you look at a distant hill.
What you see is a virtual image. No light gathers there. It is only where the rays seem to come from when you trace them back: a huge picture, far away. The model draws those traced-back lines dashed. An eyepiece magnifies by 250 mm divided by its focal length. That 250 mm is the closest an average eye can focus, the best view you get without help. So a 10× eyepiece has a focal length of 25 mm. Try the eyepieces.
The last lens is your own. The lens of your eye takes each parallel bundle of rays and focuses it to a point on the retina, the light-sensitive layer at the back of the eye. That is the final image, and it is real again: the rays truly meet there. Your eye belongs at the eye point, about 10 mm above the eyepiece. Eyepieces for people who wear glasses move it out to 20 to 25 mm.
The two magnifications multiply. A 10× objective with a 10× eyepiece gives 100×, a 40× objective gives 400×, and the 100× oil objective gives 1000×. The usual eyepiece is 10×, and 12.5× and 15× are common too. But an eyepiece only enlarges the picture the objective made. It cannot add detail the objective did not catch. With the 100× objective and the 15× eyepiece you reach 1500×, more than is useful, as the next chapter shows.
05
Why more magnification stops helping
Light is a wave, and waves spread out when they pass something very small. So every fine detail of the specimen bends some of the light off to the side, and the finer the detail, the wider the angle. To show a detail, the objective has to catch that bent light. If the light misses the lens, the detail never reaches the image, and no amount of magnifying can bring it back.
How wide a cone of light the objective can catch is given by its numerical aperture, the second number on it. In 1873 Ernst Abbe showed that this sets the limit. Today the rule is written as the wavelength of the light divided by twice the numerical aperture. In green light of 550 nm, the 10× objective, with an aperture of 0.25, shows details down to about 1.1 µm. Try the slider: violet light shows finer detail than red.
Air puts a ceiling on the aperture: a dry objective reaches about 0.95 at most. The 100× objective gets past it with a drop of immersion oil. The oil has a refractive index of 1.515, almost the same as glass, so even the widest rays pass from the thin cover glass into the lens without bending away. That lifts the aperture to 1.25, and the best objectives reach 1.40. The finest detail a light microscope can show is then about 0.2 to 0.3 µm.
So magnification helps only up to a point. A rule of thumb puts the useful range at 500 to 1000 times the numerical aperture, which is up to about 1250× for the 100× oil objective. Beyond that, the picture grows but no new detail appears. This is called empty magnification. It is also why most viruses are too small to resolve with light: they measure from about 20 nm to a few hundred. Electron microscopes use electrons, whose waves are far shorter, and routinely show details of about 0.1 nm.
06
Focus and light
On a microscope like this one, you focus by moving the stage, not the lenses. The coarse knob moves it quickly over a long way. The fine knob moves it very little: 0.1 to 0.3 mm per turn, or about 1 to 2.5 µm for each mark on its scale. You bring the specimen to just the right distance below the objective, the one that puts the intermediate image at the eyepiece.
At high power the sharp slice of the specimen is very thin. This depth of field is about 8.5 µm with the 10× objective and only about 0.7 µm with the 100× oil objective. Everything above or below the sharp slice turns to blur. Try the slider and watch the view come in and out of focus, then switch objectives and try again.
The iris diaphragm in the condenser changes the picture too. Close it and the cone of light narrows: the image gains contrast and a deeper sharp zone, but loses its finest detail, because the light no longer fills the objective. Open it wide for the finest detail, at the cost of more glare and less contrast. Makers suggest keeping it most of the way open.
One last surprise: the image moves the wrong way. The objective's image is upside down and back to front, and the eyepiece does not turn it round again. So when you push the slide to the right, the picture moves to the left, and when you push it away from you, the picture comes toward you. It takes a little practice.